FRP 使用笔记

前言
frp是中国开发者fatedier的作品,先看介绍
frp 是一个高性能的反向代理应用,可以帮助您轻松地进行内网穿透,对外网提供服务,支持 tcp, udp, http, https 等协议类型,并且 web 服务支持根据域名进行路由转发。
之前一直在路由器上使用ngrok,所以对frp一无所知。做渗透测试,需要NAT穿透,所以一直在找好用的工具,磨刀不误砍柴工。 尝试之后发现,frp用法和ngrok相似,但是frp比ngrok更加优秀。 配置过程很简单,但是也遇到一些问题,所以把过程记录下来。
安装
下载源码编译,这个编译就不是很自由,需要指定$GOPATH。ubuntu下没有指定$GOPATH,直接就下载到/src/xxxx了,然后也编译失败。
1
2
export GOPATH=$HOME/go
$GOPATH/src/github.com/fatedier/frp
下载源码
1
2
3
go get github.com/fatedier/frp
# 或者执行
git clone https://github.com/fatedier/frp.git $GOPATH/src/github.com/fatedier/frp
编译
1
2
cd $GOPATH/src/github.com/fatedier/frp
make
安装
1
2
3
4
5
6
# server
cp ./bin/frps /usr/bin/frps
cp ./conf/frps.ini /etc/frps.ini
# client
cp ./bin/frps /usr/bin/frpc
sudo cp ./conf/frpc.ini /etc/frpc.ini
配置
默认使用配置文件
Server
直接看帮助。
1
2
3
4
5
6
7
8
9
10
11
12
13
14
15
16
17root@gorgiaxx:~# frps -h
frps is the server of frp
Usage:
frps [-c config_file] [-L log_file] [--log-level=<log_level>] [--addr=<bind_addr>]
frps [-c config_file] --reload
frps -h | --help
frps -v | --version
Options:
-c config_file set config file
-L log_file set output log file, including console
--log-level=<log_level> set log level: debug, info, warn, error
--addr=<bind_addr> listen addr for client, example: 0.0.0.0:7000
--reload reload ini file and configures in common section won't be changed
-h --help show this screen
-v --version show version
支持读取配置文件,所以我们直接看配置文件。作者给出的配置文件示例已经写的很详细了。所以配置起来非常方便
1
vim /etc/frps.ini
贴出我的配置文件
1
2
3
4
5
6
7
8
9
10
11
12
13
14
15
16
17
18
19
20
21
22
23
24
25
26
27
28
29
30
31
32
33
34
35
36
37
38
39
40
41
42
43
44
45
46
47
48
49
50
51
52
53
54
55
56
57
58
59
[common]
# 支持IPv6,但是大陆网络情况下几乎不支持。这里填我们的IPv4地址,隧道端口7000
bind_addr = 45.32.42.185
bind_port = 7000
# 这个就是http代理的端口,不要和nginx冲突,否则直接闪退。
vhost_http_port = 8000
vhost_https_port = 8443
# 控制面板的访问端口,在这里我们可以看到隧道的使用情况
dashboard_port = 7500
# 控制面板访问控制,请修改默认密码
dashboard_user = your_name
dashboard_pwd = your_password
# 日志记录路径,控制面板也能访问
log_file = /var/log/frps.log
# 日志级别,可选debug, info, warn, error。这里只需要warn,免得占空间。
log_level = warn
# 日志记录时间,不知道是不是支持自动清理,记录下warn日志就够了,也不需要清理。我觉得没必要记录warn以下的信息,就不管了
log_max_days = 3
# 特权模式,开启之后,支持客户端预配置,也就是不用在服务端单独配置服务,为了示范,我还是下面加一点服务端预配置参数
privilege_mode = true
privilege_token = your_privilege_token
# 心跳包配置,默认30秒,超时应该就断开连接了
heartbeat_timeout = 30
# 设定端口范围,特权模式下端口是客户端决定的,所以要在服务端做好限制,以免影响正常服务
privilege_allow_ports = 2000-3000,3001,3003,4000-50000
# 最大连接数
max_pool_count = 100
# 认证超时
authentication_timeout = 60
# 子域名的根域名,就这样翻译吧
subdomain_host = gorgiaxx.me
# 这个用作metasploit的reverse_tcp穿透,配好token就好
[rev]
type = tcp
auth_token = gorgiaxx
bind_addr = 0.0.0.0
# !!!注意,这里一定要看服务商是否把端口过滤了。vultr把4444端口过滤了害我折腾半天。
listen_port = 4444
# 这个来代理web服务,用来传输payload
[web]
# 如果要用http代理,必须至少在前面设定vhost_http_port这个参数。
type = http
auth_token = gorgiaxx
# 子域名,最后的访问域名就是frp.gorgiaxx.me
subdomain = frp
Client
1
2
3
4
5
6
7
8
9
10
11
12
13
14
15
~$ frpc -h
frpc is the client of frp
Usage:
frpc [-c config_file] [-L log_file] [--log-level=<log_level>] [--server-addr=<server_addr>]
frpc -h | --help
frpc -v | --version
Options:
-c config_file set config file
-L log_file set output log file, including console
--log-level=<log_level> set log level: debug, info, warn, error
--server-addr=<server_addr> addr which frps is listening for, example: 0.0.0.0:7000
-h --help show this screen
--version show version
配置文件
1
2
3
4
5
6
7
8
9
10
11
12
13
14
15
16
17
18
19
20
21
22
23
24
25
26
27
28
29
30
31
32
33
34
35
36
37
38
39
40
41
42
43
44
45
46
47
48
49
[common]
# 服务器端口和地址
server_addr = 45.32.42.185
server_port = 7000
# 通过http代理访问,一般情况下用不到
# http_proxy = http://user:[email protected]:8080
# 日志路径,客户端访问这个要root权限,后面加sudo运行吧。
log_file = /var/log/frpc.log
log_level = warn
log_max_days = 3
# 服务指定给用户的token
auth_token = gorgiaxx
# 特权的token
privilege_token = your_token
[rev]
# tcp | http, default is tcp
type = tcp
local_ip = 127.0.0.1
local_port = 4444
# 加密通信,暂时不需要
use_encryption = false
# 不是http的情况下,gzip压缩也不要
use_gzip = false
[pre_rev]
# 预配置
privilege_mode = true
type = tcp
local_ip = 0.0.0.0
local_port = 5555
# 远程端口
remote_port = 5555
[web]
type = http
local_ip = 127.0.0.1
local_port = 8080
use_gzip = true
pool_count = 20
# 可以设定访问控制
# http_user = admin
# http_pwd = admin
# 子域名,最后就是frp.gorgiaxx.me
subdomain = frp
启动
frp权限控制做的比较好,不怕端口暴露在公网。所以可以放心常驻后台
服务端
1
nohup frps -c /etc/frps.ini &
客户端
1
nohup frps -c /etc/frps.ini &
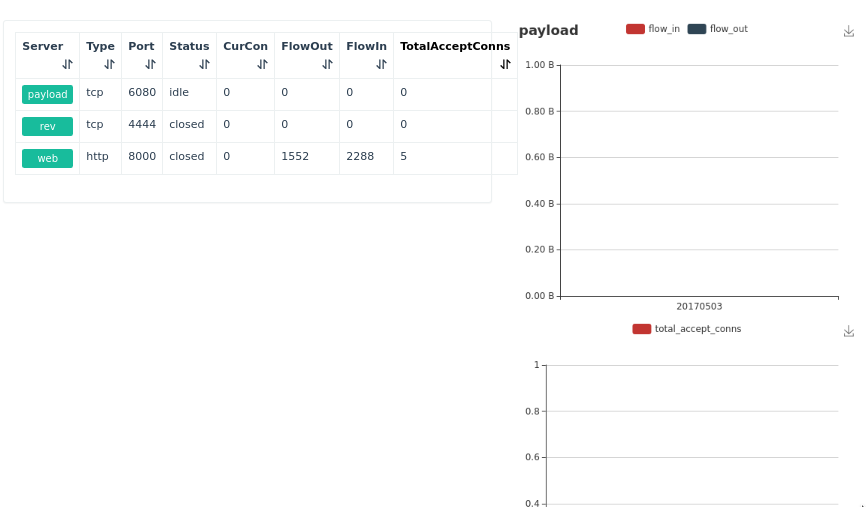
Dashboard
直接浏览器访问
1
http://gorgiaxx.me:7500/
输入用户名密码就能看到面板了